Note for Fantasy Grounds Classic Users
These instructions are for Fantasy Grounds Unity. For the current version of Fantasy Grounds (Classic), please refer to the older wiki:
https://www.fantasygrounds.com/wiki/index.php/Images
Fantasy Grounds Unity Images
Importing Images into Fantasy Grounds
Fantasy Grounds Unity supports any JPG or PNG images. These will appear in the Assets window under Images when you add them to your campaign. From there, you can copy them into your campaign, set a grid, define line of sight and use them.
Follow either of these two methods to include new images in your campaign from outside of Fantasy Grounds. If the image is online, you should first save it to your local disk.
Method 1 - Import File (Recommended)
The example is using the 5E ruleset and the built-in theme. Your screen may look slightly different depending on the ruleset you chose.
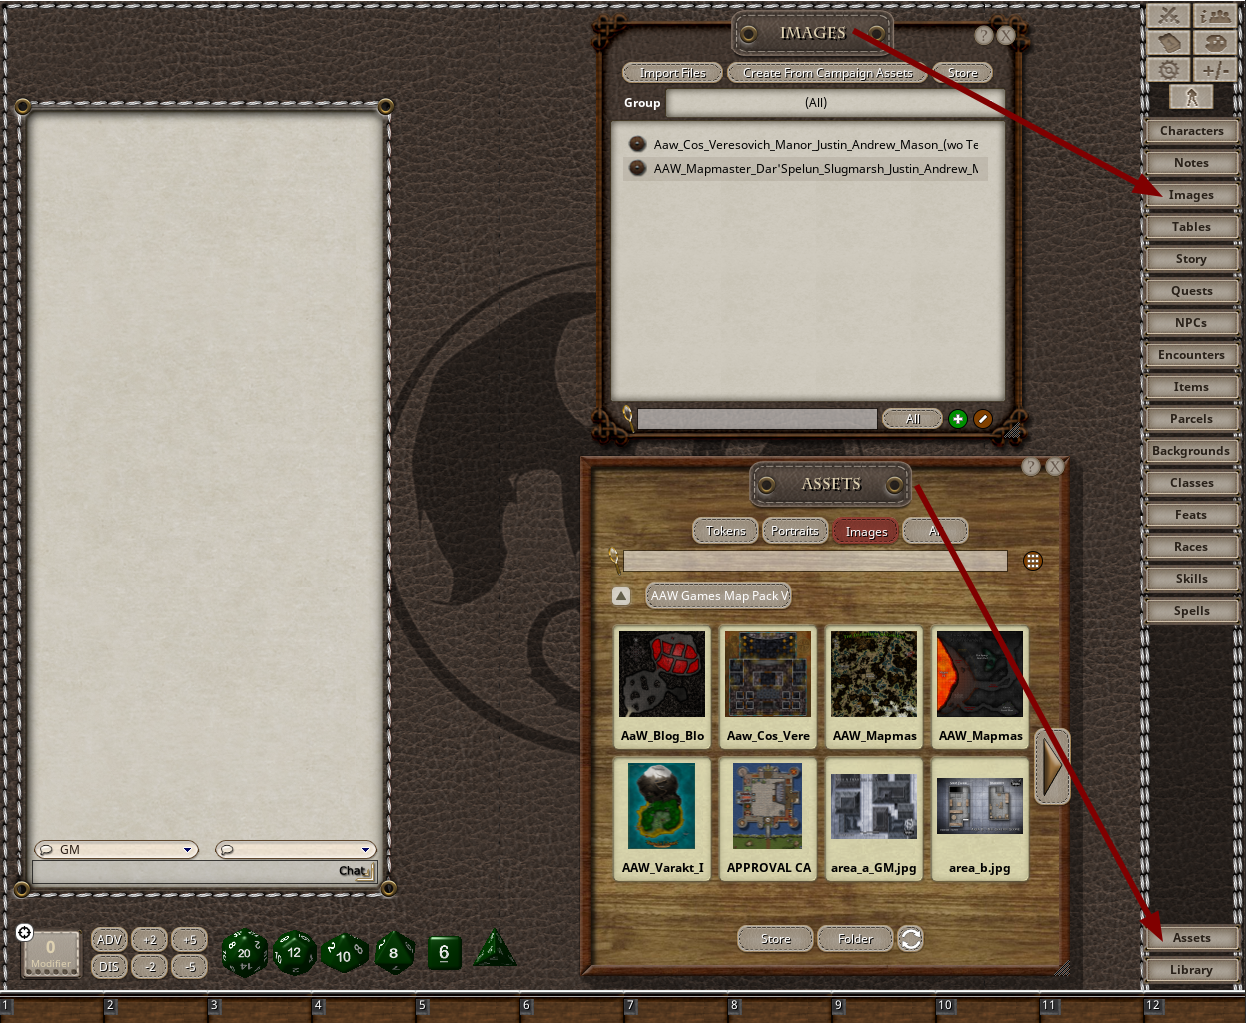
Open the Images & Maps window using the sidebar button for the ruleset you are using.
(Optional) Click on the Group Drowdown and choose which group to place the image or create a new group and choose that.
Click Import File

Browse for the file (choose either JPG Files, PNG Files or All Files)

Method 2- Import Assets (Bulk Import)
If you have a large number of files you want to import into your campaign all at once, you can use this method to do it in fewer steps.
Open your Assets window
Click on the Folder button to open your Data folder
Navigate to your campaign’s image folder
Place any images you want to use there. This will add a folder called Campaign to your Assets window under Images.
Open the Images & Maps screen from the Sidebar buttons
(Optional) Click on the Group Dropdown and choose which group to place the image or create a new group and choose that.
Click on Import Assets and answer Yes at the Prompt.

Possible duplication may occur if the images have already been imported into your campaign. Just manually delete any unneeded records using the list edit menu.
Method 3 - Manual Import from Assets
See Using the Assets Window for Tokens, Portraits and Images for more information.
For images created outside of Fantasy Grounds, follow these steps to add it to your Assets and then to your campaign.
Open your Assets window
Click on the Folder button to open your Data folder
Navigate to your campaign’s image folder
Place any images you want to use there.
Return to the Assets window and change to the Images Mode
Locate and open the Campaign folder
Drag the images from there to your Images & Maps window
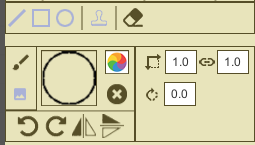
Using the Image Control
You can unlock the image to access the Image Control. Within the Image control, you have a main mode, sub-mode and then additional controls dependent upon the submode.
Modes
Icon | Description | |
|---|---|---|
 | Play Mode | |
 | Play SubmodeThis is the default mode that allows the mouse to pan the window. | |
 | Token SelectionSingle click to choose a token or draw a rectangle around a group of tokens that you want to select for movement. | |
 | Token TargetingUse this mode to select targets for an action. In most rulesets you can simply CTRL+Click on a target | |
 | Drawing Mode This mode allows simple drawing in your chosen dice color. For more advanced drawing, refer to the Paint mode. | |
 | Erase Drawing This mode changes the cursor to an eraser. The eraser removes parts of a drawing you have made. | |
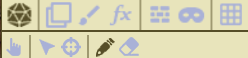
 | Additional Play ControlsZoom to Extents - resizes the image to fit inside the Image window Link Visibility - makes link visible or invisible on the map for the GM. Enable LOS - turns on or off Dynamic Line of Sight. Lock Tokens - turns on or off token locking for movement planning and approval. Snap to Grid - turns on or off snapping to grid centers, corners and edges of grids. Enable LOS requires that you have Line of Sight walls, doors and terrain defined. | |
 | Layers Mode | |
 | Layers-Transform SubmodeHere you can manipulate a layer (see Layers below) to rotate it, scale it, flip it, or change the color. | |
 | Layers-Tile SubmodeUsed to add tile images onto the map. You can rotate, scale, flip or color the tile before it is placed. Each time you click on the map, a new tile layer will be added to the Layers section. To place a tile:
Tiles can be manipulated after placement. | |
 | Paint Mode | |
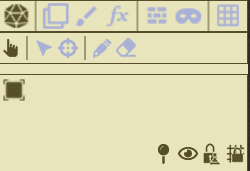
 | Drawing LinesYou can adjust the default brush size and color tint of your line. Any drawing will add a new Paint layer if you don’t already have one selected. Free-form Drawing: left-click and hold to draw a line using the mouse. Straight-lines: single click on each point where you want it to draw a straight line. Double-click or press Enter to end the line. Draw with ImageSwitch from Brush Mode (default) to Image Mode in the Image Control. Drag an image from the Assets window to the Graphic Asset area. Adjust the size, color and rotation and then draw free-form or straight lines. This is a super powerful tool that will allow you to make beautiful and functional maps when using an Image Brush. Paint cave walls, rivers, etc. *See the Line of Sight section for more on how to make your drawings block vision. | |
 | Draw RectangleClick and drag from the starting corner of your rectangle to the opposite corner of your rectangle. Hold SHIFT to make a perfect square | |
 | Draw Circle or EllipseClick and drag from the starting boundary of the ellipse to the ending boundary of the ellipse. Hold SHIFT to make a perfect circle | |
 | Adding Image StampsImage Stamps switch from Brush Mode to Image Mode automatically. To place a stamp:
Stamps are graphic images that you can use to decorate the map without creating extra layers for each stamp. It is great for painting forests, roadways, lava, cliff edges or adding debris to a map. | |
 | Erasing Drawings
Erasing works well when using the Image Brush to paint walls. You can draw a series of rectangles, circles and lines and then erase where you want doors and windows. Look for the Line of Sight section for an easy way to define walls that line up perfectly with your drawings. | |
 | FX Mode | |
 Layers list 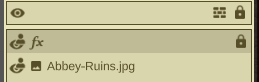 Fx Selection  | The Fx Dropdown will be blank by default. You must first add a new Fx layer by using the layer controls at the bottom of the image control. To add a new Fx layer:
Available Fx Layers:
| |
 | Layer Line of Sight (LOS) | |
 | LOS Drawing ModeThe 2nd toolbar allow Selection, Draw Line, Draw Rectangle and Draw Ellipse. They function just like drawing in Paint Mode. Hold SHIFT to draw a perfect square or circle | |
 | LOS - Wall ModeWalls block line of sight and movement for players. Walls are shown in Red. Tip: Avoiding Gaps To avoid gaps in walls, it is better to slightly overlap. This will automatically add an intersection point where two walls meet (or where it meets a door, secret door or terrain). You can then select and delete any extra points you don’t need. | |
 | LOS - Terrain ModePlayers can see into the first terrain in their vision. The back edge of the terrain blocks line of sight much like a wall. Players inside of terrain can see out of it in all directions. Terrain is shown in Green. Tip: Terrain usage Terrain is good for allowing the players to see the entire contents of an area but nothing behind it. Large statues that block line of sight unless you are standing on top of it, pillars, stairs, etc. are all good uses for terrain. | |
 | LOS - Door ModePlayers can see the contents of a door, but not beyond it. Hovering over a door will allow the option to Open or Close the door. * The GM can shift+click on the door to lock or unlock it. Doors are shown in Blue. | |
 | LOS - Secret ModeSecret areas will act just like a wall to players. The GM, however, will have the option to open the secret door. This will allow players to see through the area and move through it. * The GM can shift+click on the door to lock or unlock it Secret doors are shown in Blue with a dashed line. | |
 | LOS - Window Mode Windows allow players to see through the window but not move through it unless it is opened first. Windows can be locked * The GM can shift+click on the door to lock or unlock it Windows are shown in Yellow. | |
 | LOS - Illusionary Wall Illusionary Walls are lines that block line of sight just like a wall, but which do not restrict player movement. Players can move straight through the wall without GM intervention. Illusionary Walls are shown in yellow dashed lines. | |
 | LOS - Pits (Experimental) Open pits block movement and vision out of the pit when the token is inside the pit. Closed pits have no effect on movement or vision. * The GM can open or close the pit | |
 | LOS - Duplicate Paint Lines
| |
 | LOS - Remove Selected PointsThis will remove the selected point(s) in a line you have defined. It will maintain the existing line or shape if possible and will reconnect the points. Tip: Optimization This is good for reducing the number of points in a drawing to improve performance. | |
 | LOS - Delete Selected PointsThis will remove the selected point(s) and break the parent line in two. Tip: Cutting a line This is great for cutting out a section of an existing wall. | |
 | LOS - Magnetic SnapClick this to turn on or off Magnetic snapping to existing points. When on, it will snap to any nearby points to help prevent any gaps. When off, it allows for greater control. This is useful when you want to insert extra points near other points. Hold CTRL when placing a point to temporarily toggle this setting without changing it overall. | |
 | Global LOS | |
 | Enable or Disable Global LOS MaskClick the + icon to turn on Global Mask. It will add a dark gray layer over the map. Click the - icon to disable the Global LOS Mask. | |
 | Remove Rectangle from Global LOS MaskClick and drag from one corner of a rectangle to the opposite corner. Hold ALT when drawing to make a freeform selection. | |
 | Fill Rectangle on Global LOS MaskClick and drag from one corner of a rectangle to the opposite corner. Hold ALT when drawing to make a freeform selection. | |
 | Grid Mode | |
 | Mouse Assignment for Grid SizeSwitch from Edit Mode to Mouse Assignment and then drag from the upper left corner of a map square to the bottom right to set the grid size and location. Edit it further using the edit controls. | |
 | Set the Grid TypeYou can choose
| |
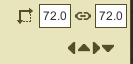 | Adjust GridYou can adjust the width and height of the grid in pixels. You can use decimal points. Unlink width and height if they are not the same using the link button in between width and height. Use the arrow keys to nudge the grid placement. Warning - Isometric grid maps Many Isometric maps available online are not truly iso maps. An Isometric map should have the points of the diamond be in line with each other horizontally and vertically and each diamond should be consistently sized. | |
Keyboard Shortcuts
Keyboard shortcuts change depending on which mode is selected.
Mode | Keyboard | Action |
|---|---|---|
Play Mode w/ Token Selected | Arrow keys | Move up, down, left or right by 1 grid square. Use the Number Pad to move diagonal as well. |
Drawing Mode or Line of Sight Mode (no points selected) | Arrow keys | Pan the map by 1 grid square in the direction of the arrows Hold CTRL to pan by a smaller amount. |
Spacebar | Add a new point at the current cursor position and continue editing this drawing. | |
Enter | Add a new point at the current position and complete the current drawing. | |
Esc | Cancel the current drawing and complete it at the previous point | |
Ctrl+Z | Undo last action | |
Ctrl+Y | Redo last action from Undo | |
CTRL | Temporarily toggle grid snapping mode for next point (while held) | |
Layers Transform w/ Tile Selected | Arrow keys | Move currently selected tile by 1 grid square in the direction of the arrow. Hold CTRL to move by a smaller amount. |
Layers Trasnform w/ Tile Selected | Shift+Left Arrow | Spin current tile clockwise or counter-clockwise by 45 degrees. Hold CTRL to rotate by 1 single degree. |
Shift + Up Arrow Shift + Down Arrow | Increase or decrease scale of current tile by 1 grid square Hold CTRL to scale by 1 pixel. |
Right-Click Menus
Menu | Description |
|---|---|
 | Main MenuIn Clockwork order from the top. Close Window Zoom - Zoom in or out Layers - Grid, Pins, Mask visibility Drawing - freehand drawing on the map Share Sheet - shows the image on the players' screens Pointers - Draw cones, squares, circles and arrows using the grid coordinates. |
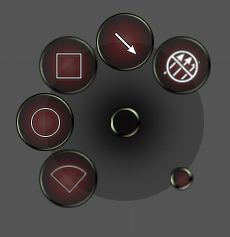 | Pointers MenuRemove Pointers - removes any pointers on image Arrow - useful for pointing out features Square - useful for defining areas Circle - useful for defining areas Cone - useful for spell area of effects Players can draw pointers |
 | Drawing MenuUnlock Drawing Mode - toggle locked and unlocked state Enter Drawing Mode - this does not have the same level of features as the Image Control options explained earlier, but it allows for simple drawings with the default drawing brush. Players can use this to draw on maps |
 | Zoom WindowZoom to Fit - will try to fit all image layers into the visible area of the screen. Restore Zoom - resets the zoom to fit the previous zoom level. If your mouse has a scroll wheel, this is the easiest way to zoom in and out around the current cursor position. |
 | Layers MenuToggle Shortcuts - this changes visibility for shortcuts (GM Only) Toggle Grid - hides or shows the grid Snap to Grid - on or off (hold CTRL to override) Enable Mask - this turns on or off the Global mask |
Using Dynamic Line of Sight for Maps
Some maps may be preloaded with line of sight (LOS) data. For other maps, you can create your own LOS data. Refer to the Map Line of Sight Style Guide for more info on creating your own LOS data.
Open your Map and unlock it to reveal the Image Control
Verify that the layer with the map has an indicator showing that LOS has been defined (see image)
Turn on Enable LOS. It is off by default
Drag a player token onto the map from the Combat Tracker (or add an NPC from an encounter or Combat Tracker)

If you want to build your own version of LOS that differs from any built-in definitions, you can unlock the layer and then disable that layer’s LOS definition. Next, you can add a new LOS layer (available at the bottom of the Image Control) and then start drawing your new version. Refer to the Style Guide.